Showing posts with label Judy_em. Show all posts

Sunday, March 22, 2015

Breaking DIY's First Giveaway Winner!


I'm pleased to announce the winner of Breaking DIY's first giveaway. An enormous thanks for all the folks who entered, shared, and supported on social media. We're off to a great start and look forward to continued post.

Drum roll please!

The winner of our first giveaway is Christina P!
I hope you enjoy the coffee table!
Contest Drawing and Timestamp
Crate Coffee Table


Thank you so much for all the love and support. Please subscribe, share, comment, and stay tuned for other projects and giveaways. I plan on keeping this blog going for at least three months. Please feel free to suggest project. Think about projects that you'd like see, but don't have the time, energy, or tools to do. I'll give them my best shot and write about them here. Check out this week's post here. Thanks again for all the love!


Sunday, March 15, 2015

DIY Crate Coffee Table


“Are you sure we can pull that off? It looks a little difficult and what if it’s the wrong size? Is it even durable?” I casted my doubts to my partner after she suggested we make a coffee table she came across on Pintrest. That conversation took place over a year ago and I had no idea that I’d be hooked. A DIY fiend, I have become.

In this post, I delineate the steps of creating your own crate coffee table along with some of the things I’ve learned through the process. Also, there is a video of assembly here.


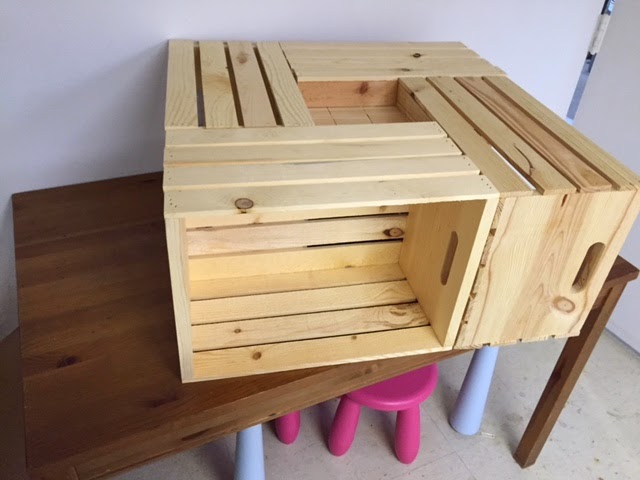
Optional Insert (unstained)
Supplies
  1. Four (4) crates* (available from Home Depot, Michaels, and other locations)
  2. Quarter of a ½” plywood sheet
  3. Four (4) 3” casters** (available from Ikea or HD)
  4. Stain
  5. Polyurethane (recommended)
  6. Spare wood
  7. Wood Glue
  8. Wood screws (30+)


*Michaels typically has the best price and often has coupons to reduce the price further.
**This is the most costly aspect of the project and optional if you don’t want the table to move

Tools
Unstained - Alternate View


  1. Orbital sander
  2. Circular Saw
  3. Drill
  4. Paint Brush 
  5. Foam Brush


Step 1: Prep/Sanding
Remove the affixed price tag from the crates. It doesn’t have to be immaculate, the sander will take care of anything not removed. I recommend sanding the inside thoroughly. The roughness of the wood on the inside makes it difficult to stain. Essentially it doesn't matter too much if the inside is not sanded down completely, but it does make staining a bit easier.

At this time, cut a 9"x9" square of wood. I used an old wine box cover from Binny's They sell them for $2. This step can be skipped. Cut the piece into three 3"x9" slats. These slats will serve as the center cubby.

Step 2: Staining
After sanding the lumber, wipe down the lumber in preparation for staining. Use compressed air to remove pesky saw dust. We played with a couple of stains before deciding on carrington, one of our favorite stains. Make sure the work area is free from anything that can be damaged by the stain. Trust me, stain will get everywhere. Using a brush, apply the stain and wipe off immediately with a clean rag. The longer stain sits on the wood, the darker the wood will get, but less grain will show. I work my way from inside the crate and wipe off any stain that makes its way to the outside of crate. 


Step 3: Polyurethane
I used polyurethane to make sure that cleaning the table would be a breeze and for durability. We've had our table for about a year and it is holding up nicely. Decide which side will act as the top of the coffee table. I try to pick the most aesthetically pleasing side and also make sure the inserts will fit. Sometimes the inserts will not fit because the boxes do not line up properly). Using a foam brush, apply the poly evenly. Try to catch any drips that fall inside with newspaper. Also, carefully apply poly to the knots in the wood. Poly tends to turn a blueish color when it dries and will settle inside the spaces if not remedied.

Use two screws to secure the boxes
Step 4: Assembly
Boxes - Using wood screws attach one box to the other as pictured. Continue until all four boxes are attached. I used two screws towards the top of the table. Drill guide holes and hold the boxes firmly together while drilling.

Base - Once the boxes are attached, flip the table and screw in the base. Be sure to pre-drill holes and drill into the thickest part of boxes (the short edges). I made a mistake and screwed through one of the thinner pieces of wood. It now protrudes and could be a hazard.

My attempt at gluing the slats (look at the very top)
Casters - Pre-drill holes for the casters. I like placing my casters about 1" away from each corner. 

Inserts/Cubby - Use wood glue to secure the insert to the box. It's not easy to do, and I'm sure there's a better way to do this. Once the slats were in place, I placed a drill inside the cubby to keep the slats pressed down while the glue dried. 

Once the glue is dry, the table is complete. Enjoy!

If you liked this project please subscribe and follow me. Also, this month to kick off my blog, I'm going to have a give-away. One lucky participant will have a chance to win this coffee table (A $200 value).  See details on my wife's youtube page

Giveaway Requirements:
1. Subscribe to my wife's youtube channel
2. Subscribe and comment to this blog post
3. Repost my blog on Facebook or instagram using the hashtag #BreakingDIYGiveaway

Rules:
Winner must live within 20 mile of our neighborhood for local delivery. If winner lives further than 20 miles, winner will have to arrange for pick up. Winner will be selected on March 22, 2015. Good luck!

Final Product


If I were going to make this table again...
Babies love this, but it's totally not baby safe. 
  • On our first try, we skipped the insert and the base. The table has held up for over a year and only needed some tightening. I would op for the base, but measure carefully!
  • We also opted for the KALLAX casters for further support. A problem we incurred is the screws penetrated the wood further than expected to secure the wheels. This is okay since we don't have kids and we typically load up decorations over the screws. With no plywood base, the table doubles as a baby walker. 


Stay tuned for my next project!
Black Pipe and Lumber Dining Table